Monday, February 17, 2014

Visualizing My Dining Room in a New Hue

No project here today!  Although I'm working on a few different ones as we speak...

Just a little friendly chit chat.  I'm getting that painting itch again and I need somebody to confide in and well, let's face it, my blog has nowhere to hide.

And any how Shaun doesn't wanna hear it.  He prefers it when I just work my magic on the house while he's at work.  He wants no part of my DIY and crafting!  Unless I start decoupaging space ships or something.

It's quite a bold move, but I'm dreaming of a fresh coat of black paint in my dining room.

A bold color choice like this is not something I take lightly, as it could go very wrong.  Like in a my-high-school-bedroom, red walls/black ceiling sort of way.  Which was cool in high school, but a little too bold for 26 year-old Betty.  I'm looking for something a bit more sophisticated these days.  Something lacking in the band poster department.  I wanted to take this color for a little test drive even before picking up any test pots.
Enter: Sherwin-Williams Paint Color Visualizer.

They have a few cool color tools and this was my first attempt at using one.  Fun and easy to use (and no they aren't paying me to say that.)  I'm a sucker for 'before and afters.'

My dining room now:


This is a fairly recent picture of my dining room.  You get the idea.  It's currently painted in Behr's "Silver Screen," but I'm growing tired of the dull gray color.  I love my beautiful wood furniture and I just don't think it's very complimentary.

Now try this on for size:
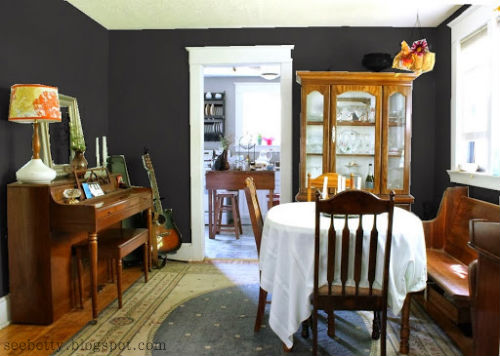


My beautiful heirlooms seem to pop right off the wall now.  They look so much richer with the dark backdrop and my well-loved wood floor is beautiful again!  The color is "Black Magic" and I'm totally sold on it.  I think that, being a cool-toned neutral, it compliments the orange tone of my wood pieces perfectly.

On a side note, isn't my ceiling looking a bit dingy?  I think a fresh coat of soft white paint is past due.  Add that to the list.  As well as finding a new rug.  I'd love something more graphic.  Hell, why not just make a quick mood board?!
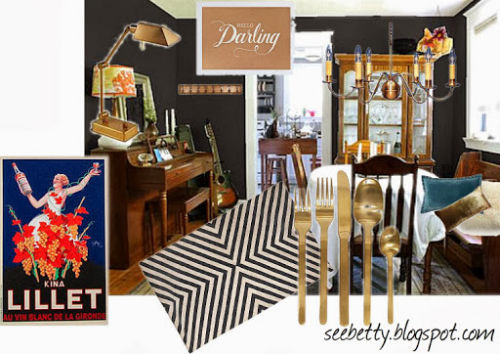


Doesn't it just all look so magical...?  I'm forever obsessing over the gold flatware.

This is my ideal endpoint for what I want my dining room to be.  Already have the Kina Lillet, wood-mounted wall hooks, brass task lamp to replace the oversized lamp on the piano, and the chandelier.  (Haven't shared that one with you yet, but I promise I'll post it soon!  I re-wired and painted a thrifted chandelier similar to the one pictured.)

I still need to add in some comfy pillows or cushions to my church pew and some more art.  I really like this "Hello Darling" print from Sugar Paper.  $50 for a small print is a little rich for my blood, but a DIY version may be in order.

Need to do some brainstorming about what to hang where those tired coconut baskets are.  They've gotta go.  I was thinking something earthy like a hanging terrarium..?

I'm finding this dining room more and more impossible to resist, so as soon as I find a spare day...

Thanks for reading!


betty signature

Tuesday, February 4, 2014

Kitchen DIY: Homemade Yogurt

DIY doesn't strictly apply to things like making your own jewelry or getting creative with some nailhead trim.  (See what I did there?  I linked you to a couple pretty amazing little DIYs.  You're welcome!)

It doesn't have to mean getting out the power tools.

I really get a kick out of making all sorts of things from scratch.  And I don't know about you, but scoring a great deal on anything is an unmatched adrenaline rush.  That's why when I stumbled on the idea of making my own yogurt for a fraction of the price, I went for it.  I spent a lot of time researching the process on the good ol' internets.  I found a lot of great information on different blogs and websites from people sharing their own trial and error advice.


One of those blogs was Bacon in my Pocket.  Ma Bacon sums it all up!  Choosing to make the plain yogurt (I always get plain greek yogurt and add flavor later with honey, granola, fruit, etc.) I followed her procedure exactly and it was a success.


The only differences:

  • I used full fat milk.
  • I used a 5.3 oz. cup of Chobani plain greek yogurt as my starter yogurt.
  • I left mine to incubate for the full 10 hours.


It came out perfectly thick and delicious.  As somebody who loves their yogurt, I couldn't be happier with the results.  I use it for sooooo many things; a substitute in many recipes (Shaun says these are his favorite pancakes now) and eating it for a light dessert with some honey and granola.  Which makes it all the better that it only cost me $3.28 for 4 quarts as opposed to the $22.76 I would spend for the same amount at the store!


This is definitely a diy that I will continue doing.  It's too easy not to if you have the time, why not?  I'm also a control freak and knowing exactly how, where, and with what my food is made is very appealing to me.  


I'm pretty impressed.  Never thought I'd be growing up and making my own yogurt and all.  Think you'll try this?


betty signature

Thursday, January 23, 2014

Bedroom Set Face-Lift

I was at Home Depot with a couple of gift cards still leftover from Christmas burning a hole in my pocket.  While perusing the paints/wood stains I came across some Howard Restor-A-Finish.  I'd been wanting to try this stuff out for some time after reading about it on a few of my favorite blogs.  It's supposed to revitalize wood finishes and fix minor scratches and markings without the bother of sanding.

My mind went immediately to my poor old bedroom set.  I've had it since 2006 after purchasing the whole set from a local antique store.  I love it just the way it is, but it has been looking rather run down lately and I really wasn't ready to freshen it up with a coat of paint.  I have my dresser and vanity done so far.  Take a look!


Luckily the Restor-A-Finish in 'Walnut' spruced it up just enough to get it looking lovely again.  Here are some comparison shots:


You can see how much drier the sides are in the first picture.


The wood in the center of my vanity gets very dry and dusty because that's where I do my makeup daily.  It conditioned that area nicely and got rid of a ton of minor water marks.  You'll notice in the pictures above that it reduced the ring on the corner and a scratch near the bottom, but did not fix them completely.  I applied my Restor-A-Finish with a soft cloth, which is for minor blemishes.  Had I wanted to repair more major ones I could have used steel wool to rub on the finish, but I like my furniture to look its age a bit.

After wiping on the Restor-A-Finish and waiting 15 minutes, I wiped on a thin layer of Minwax Finishing Wax to seal it in.  Leave that on for another 15 minutes and then buff.  I love the satin-y sheen that it added to the top.  It really makes the woodgrain stand out much nicer.


I'm very pleased with the results.  This stuff is so fast and easy to use, not to mention well worth the $8!  I didn't even use up a third of the can on those two pieces.  I've still got a ton of furniture that could use the Restor-A-Finish treatment so call me in a couple weeks.  Until then I'll be buried under a pile of dried up furniture in a well-ventilated room.


betty signature

Monday, January 20, 2014

Old Mailbox Turned Salt Bin

The problem looked a lot like this:

Not cute, right?  It was a snow day.  I was buried in the house with no way out, nothing to do, and this thing staring me in the face.  I really wanted to find some sort of more...visually appealing container to store my salt.  Working with what I found around the house, I turned a beat up roadside mailbox into a cleaned up bin to keep salt right next to my front door.


When I'd searched the whole house with no luck, I turned to rummaging through the garage and came out with an old mailbox.  Dirty and dusty, complete with a '$5' garage sale sticker.  I did not buy this mailbox at a garage sale.  No clue where it came from, but I knew it would be perfect for the task at hand.

(iPhone 'before' picture.)

I wiped it clean with some paper towel and my water/vinegar mix (50/50) that I use for general cleaning purposes.  Then I took my hairdryer to the adhesive house numbers on the side, one by one, and peeled them all off very carefully using a razor blade.  This was not a quick process.  The house numbers peeled off mostly in smaller pieces.

Once I had the adhesive off, I used a sanding block to scuff up the outside of the mailbox that I planned on painting.  Even though it started out black, I decided to stick with it.  It definitely needed a fresh coat of paint though and I used semi-gloss versus the very glossy finish before.

First I used a new spray primer that I just learned of specifically for bonding paint to metal, Rustoleum's Clean Metal Primer.  It went on great and is holding up thus far!  I followed one coat of that with two coats of their semi-gloss black, with about an hour in between coats.


When it was all dry I fitted it with a cute antique pull, from one of my many treasure collections around the house, and set it up right in my front entry.  I lined it with a trash bag since there were a few gaps in some places and poured all that sidewalk salt from eye-sore bag to classy salt bin.  Problem solved.


The best part about this cheap mini-project was that this seemed to be the first thing that I've done around the house that Shaun was completely impressed by.  Go figure...

*Cue Liz Lemon eye roll.*

He really enjoys the simple things, I guess.


What have you upcycled around your house recently?  Have any trash that you've made into treasure?  Please share!


betty signature

Friday, January 17, 2014

Holiday Highlights.

Just for fun, here's an Instagram flashback of what I was up to this holiday season while I wasn't, well...here.


Went to see ZZ Top with my parents. // Ate Thanksgiving dinner FOR DAYS (and in the bath tub, no shame in this game.) // Got my Christmas decorations up. // Discovered baking my apple peels at 250 degrees for 50 minutes.  Delicious!  No more wasted peels. // Out of town friends, back home for the holidays. // Christmas baking!  Lots and lots. // Christmas Day finally! // A picture of my sisters and I that I took as a Christmas gift for my mom.  She loved it! // Mini vegan gingerbread houses handcrafted for my besties. // New Years Eve! // Mally's new collar I fixed up out of an old leather belt.  I'm quite proud of it.  :)


It has been an action-packed few months.  I didn't even include anything from my birthday, shaun's birthday, or all of the friend-Christmas parties we had!  I'm glad to be back to my daily routine.  Hibernation mode.


betty signature

Tuesday, January 14, 2014

Jumping on the Bandwagon.

First real post since my holiday hiatus and I want to share something real special with you for our 2014 reunion.  My favorite change that I made to the house in recent months:

Drum roll, please...

...


.....


......


........


OPEN SHELVING IN THE KITCHEN.


Something I've had my heart set on for some time, but I wanted to really weigh the pros and cons before I yanked the cupboards out and all that mess.  Not to mention the whole convincing of the Shauny.  I try to include him in these things since I guess it is his house too.  ;)


(Took pics in the middle of swapping out the white knobs for shiny brass!)


These shelves are just about my favorite thing in general.  I made them a while ago from the frame of my old water bed from high school.  Haha.  That just sounds funny to me.  I spied the old frame pieces in the rafters of my parents' garage one day and decided they had a higher purpose to serve.

I sanded, stained, and poly-ed until they became just what I was looking for in kitchen shelves.  I've had them on a couple different walls in here until I finally decided to go for it and take out those upper cabinets.


I'm in love and now that they've been up for a couple months I am sure I made the right decision.  Space is not something I can afford to waste in this kitchen and I felt that there was a lot of wasted space with the cabinets.  ESPECIALLY the corner cabinet.  I couldn't reach anything that wasn't right up front and that was on the lower shelf.  The upper shelf?  Forget it!  Now all of my things are within my reach, even on the higher shelf.  It's quite liberating.


Not only the accessibility, but the look of open shelving has always been appealing to me.  I get to put my collection on display.  And for a person who loves her things this is very gratifying.  I also keep daily essentials right out in the open.  Convenient and cute in their glass jars.


I don't have any problems with dust because I've filled my shelves with things that are in pretty regular rotation and used daily or weekly.  My stove isn't nearby so I haven't had to worry about grease.  However, that will eventually change as the plan is to move the stove to the area where the fridge currently sits.  I'll have to keep you updated on that aspect.

My shelves are very sturdy.  I used basic, nothing fancy brackets from Home Depot appropriately sized for my shelf depth and weight.  We also made sure that the brackets were placed correctly to screw into the wall studs.  I have a ton of crap on them, including my heavy dutch oven, and they remain stable.  It was a lot of stud finding, measuring, drilling, re-drilling, and hole-filling (as for those last two, we just suck at finding studs) but worth it for the end result.


Open shelves aren't for everybody, but they are for me!  If you're considering them for your space, do your research and weigh the pros and cons.  There're lots of great examples to look at on the internet.  One thing that I did before deciding on them was to find and read about other bloggers who turned to open shelving and reviewed their performance thus far.


If you have any questions on these babies that I haven't thought of feel free to ask!

This setup has been a major design trend in recent years, but I think its here to stay for a while.  Would you ever take the plunge into open shelving in your kitchen?  Have you already?


betty signature

Saturday, January 11, 2014

I'm baaaaaack!

I was a very irresponsible blogger and dropped off the face of the Earth for a while with no explanation.  Life, man...it happens.

I'm not a person who deals with stress like a champion and the holidays were more busy than ever for me.  I run on a very one track mind and am not skilled when it comes to juggling so a lot of things in my life tend to drop off and go to the wayside when another, seemingly higher priority, task is at hand.  I tend to get pretty easily overwhelmed.  Add that to my personal list of things to work on.

I do enjoy keeping my blog and I vow to do betta!  I've found that baby steps work best for me when it comes to self-improvement.  When I left my blog the idea behind it was more crafty, DIY, home decorating.  After some soul searching (a.k.a. constant socializing, holiday over-eating, and New Years resolution-ing) I've decided to take things in a slightly different direction.  Still DIY, but more than just home improvement.  'Cause really, doing it yourself can apply to many aspects of your life.  I'm into DIY-ing my home as well as my food, household and beauty products, and everything in between.  This is now me sharing a more natural progression towards a healthy, happy, and more sustainable life.


So, file this post under 'feelings...'

Thanks for sticking with me and here's to a new year!  :)


betty signature

You might also like:

Related Posts Plugin for WordPress, Blogger...